How to Estimate Floating Point Errors Using Automatic Differentiation

Tutorial level: Intro
For the purpose of this tutorial, we will look at a very simple estimation model that is a slight modification of clad’s in-built Taylor approximation model. The first step of translating your model to code is to understand how you could represent it mathematically as a formula. For example, the mathematical formula behind the in-built Taylor approximation model is:
\[\begin{align*} A_f = \sum\limits_{i=1}^n \frac{\partial f}{\partial x_i} \ast |x_i| \ast |\varepsilon_M| \end{align*}\]Where,
- Af is the absolute error in the function that you want to analyse. We will refer to this as the “target function”.
- df/dxi is the partial derivative of the target function with respect to the ith variable. This is where clad comes in: it provides us with the derivatives we need in our models.
- xi is the ith variable of interest, here all floating point variables in the function are our variables of interest. All values, including temporary ones with limited scope, have to be analysed to get the most accurate estimation.
- Em is the machine epsilon, which is a system dependent value giving the maximum error in the representation of a floating point number. This is the relative error in floating point values and has to be scaled up to be of any meaning. Hence, you see the xi in multiplication.
Each ith term in the above summation becomes the error contribution to the total error by the ith assignment. The summation of all those values gives us the final absolute floating point error in the target function.
Now that is what clad implements, and you might be able to tell that because of the use of the machine epsilon, the estimates we get from the default model are very strict (i.e., they report a tight upper bound on the error in the function). Which means while we can say that our target function will never exceed this specific amount of floating point error, it is sometimes necessary to get even tighter bounds. To achieve that, we can go one step further by incorporating the actual errors in the values themselves. This means that we can simply subtract the current value by the same value but with lower precision and use that as the error metric. So, our modified Taylor approximation model would look something like this
\[\begin{align*} A_f = \sum\limits_{i=1}^n \frac{\partial f}{\partial x_i} \ast |x_i - (float)x_i| \end{align*}\]Here we have cast xi down to float from double. This model
however imposes a constraint that all our floating point variables should
be of type double or higher.
Once you have a solid formula for each value of interest, the only thing that remains is translating that into a function. We have a formula that we just derived in the previous section and now we have to convert that to a function. So before we begin writing a function, it is important to understand how clad is internally able to generate error estimation code.
Clad works on the very simple concept of a Recursive AST Visitor. For brevity’s sake, we will not be discussing ASTs in depth in this tutorial. In a gist, these visitors recursively visit each statement in a program in a depth-first manner. To illustrate the visitation, consider the following simple example:
Let’s suppose we have a semantically correct statement in our program as follows:
\[\begin{align*} x = a + b \end{align*}\]The AST visitation of the above statement will look like this:
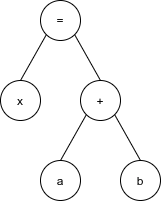
Now, clad will generate error estimation specific code on the leftmost leaf
node of the above tree using the AssignError() function, which we will be
overriding later in the tutorial. This also implies that clad will only
generate error estimates for assignment operations, more specifically, it will
generate errors for the LHS of all assignment operations.
Now that we have an idea of how the error estimation framework works, all we have to do is:
- Inherit from the
clad::EstimationModelclass - Override
AssignError()andSetError()functions - Register our derived class with the
clad::plugin::ErrorEstimationModelRegistry - Compile our new library into a shared object
And we will be ready to use our custom estimation model!
First, let us make a header and a .cpp file to get started. For this tutorial,
let us refer to our custom model as CustomModel. Once you have created the
files, populate them with the following code:
CustomModel.h
#include "clad/Differentiator/EstimationModel.h"
#include "clad/tools/ClangPlugin.h"

class CustomModel : public clad::EstimationModel {
public:
 clang::Expr* AssignError(clad::StmtDiff refExpr);

 clang::Expr* SetError(clad::VarDeclDiff declStmt);
};
CustomModel.cpp
#include "CustomModel.h"

clang::Expr* CustomModel::AssignError(clad::StmtDiff refExpr) {
    // Populate here with your code
}
clang::Expr* CustomModel::SetError(clad::VarDeclDiff declStmt) {
    // Populate here with your code
}

static clad::plugin::ErrorEstimationModelRegistry::Add<CustomModel>
CX("customModel", "Custom model for error estimation in clad");
Before we start filling in the definitions, let’s look at the last statement in CustomModel.cpp
static clad::plugin::ErrorEstimationModelRegistry::Add<CustomModel>
CX("customModel", "Custom model for error estimation in clad");
This statement tells clad to register our custom model. Without this statement, clad will be unable to locate our derived class and its functions and will throw a symbol lookup error during its usage.
Now, the only thing left to do is to populate the two functions with our custom logic of error estimation.
First, let’s look at SetError, which is used to initialize the error associated
with each variable of interest. This function might be suitable if we know of an
intrinsic error for all the variables and want that to be a part of the final
error. For now, let us return a nullptr which clad will interpret as a 0
literal. Which means that clad will initialize all error values as 0.
clang::Expr* CustomModel::SetError(clad::VarDeclDiff declStmt) {
    return nullptr;
}
Now, let’s look at the AssignError function. Recall that we want to translate
the following mathematical formula into code:
First, we can obtain the partial derivative of xi using getExpr_dx().
Here, refExpr refers to xi
clang::Expr* CustomModel::AssignError(clad::StmtDiff refExpr) {
   // Get the df/dx term
   auto derivative = refExpr.getExpr_dx();
}
Now, we need to create the float subtraction expression. So, we essentially
need to get xi and cast it to float and then build a subtraction
expression. First let’s look at how we can build a cast expression. Here we
use BuildCStyleCastExpr as follows:
clang::Expr* CustomModel::AssignError(clad::StmtDiff refExpr) {
   // Get the df/dx term
   auto derivative = refExpr.getExpr_dx();
   auto expr = refExpr.getExpr();
   // Get the cast expression
   auto castExpr = m_Sema
                      .BuildCStyleCastExpr(
                          expr->getBeginLoc(),
                          m_Context.getTrivialTypeSourceInfo(m_Context.FloatTy),
                          expr->getEndLoc(), expr)
                      .get();
}
Now, let’s use the BuildOp shorthand to build the subtraction expression.
Note, the first argument to BuildOp is the type of operation and the next
are the LHS and RHS of that operation.
clang::Expr *CustomModel::AssignError(clad::StmtDiff refExpr) {
  // Get the df/dx term
  auto derivative = refExpr.getExpr_dx();
  auto expr = refExpr.getExpr();
  // Get the cast expression
  auto castExpr = m_Sema
                      .BuildCStyleCastExpr(
                          expr->getBeginLoc(),
                          m_Context.getTrivialTypeSourceInfo(m_Context.FloatTy),
                          expr->getEndLoc(), expr)
                      .get();
  // Build subtraction operator
  auto subExpr = BuildOp(BO_Sub, expr, castExpr);
}
Since clad internally builds the assignment, we only need to return the
multiplication expression. We can use the same buildOp to get that done!
clang::Expr* CustomModel::AssignError(clad::StmtDiff refExpr) {
   // Get the df/dx term
   auto derivative = refExpr.getExpr_dx();
   auto expr = refExpr.getExpr();
   // Get the cast expression
   auto castExpr = m_Sema
                      .BuildCStyleCastExpr(
                          expr->getBeginLoc(),
                          m_Context.getTrivialTypeSourceInfo(m_Context.FloatTy),
                          expr->getEndLoc(), expr)
                      .get();
   // Build subtraction operator
   auto subExpr = BuildOp(BO_Sub, expr, castExpr);
   // Return the final multiplication operation
   return BuildOp(BO_Mul, derivative, subExpr);

}
And voila! We are all done with writing our custom estimation model!
Lastly, we have to compile our source into a shared object. For this we shall first set up some environment variables to simplify following the rest of the tutorial. In a terminal, run the following:
export CLAD_INST=$PWD/../inst;
export CLAD_BASE=$PWD/../clad;
Then execute the following:
CLAD_INST/bin/clang -ICLAD_BASE/include -fPIC -shared -fno-rtti -Wl,-undefined -Wl,suppress ./CustomModel.cpp -o libCustomModel.so
The above command creates a shared library called libCustomModel.so. Now to use this shared library with clad, simply pass it via CLI when invoking clad as follows:
-Xclang -plugin-arg-clad -Xclang -fcustom-estimation-model -Xclang -plugin-arg-clad -Xclang ./libCustomModel.so
That is, a typical invocation to clad will now look like this
CLAD_INST/bin/clang -Xclang -add-plugin -Xclang clad -Xclang -load -Xclang CLAD_INST/clad.so -ICLAD_BASE/include -x c++ -lstdc++ -Xclang -plugin-arg-clad -Xclang -fcustom-estimation-model -Xclang -plugin-arg-clad -Xclang ./libCustomModel.so some.cpp
Yay! You have successfully generated code instrumented with your custom estimation logic!
To know about what all the error estimation framework is capable of, checkout the docs here.